Value Engineering & Security
By Matt DePrato, VP, Preconstruction & Development
Curb appeal might be the first draw for your potential customers, but close behind that is the security of their unit contents. You want to be able to assure your customers and prospects that you’ve got all the bases covered in the realm of site security, but you also want to prevent overkill in the areas of type and quantity — and expense — of equipment.
In previous articles about value engineering, I’ve mentioned that the coordination between architects and designers, and the intelligent application of resources, can go a long way toward achieving essential functions at the lowest total costs over the life of the project. This is true for aesthetics, site layout – and also for security.
In this article, I’ll focus on a few important value engineering suggestions that my team offers building owners when it comes to adding a thorough level of security to a self-storage facility.
Our approach to security layout is to think of the various elements in terms of pyramids: make sure you attend to specific, primary areas first, then move on to secondary and tertiary areas and so on.
It is important to note that these tiers are all equally important in terms of security. Our use of the “pyramid” simply indicates which areas should be most thoroughly addressed before moving to the next tier, and which areas might be able to have less equipment than others.
Camera placement
Cameras are important for the security of your site, not just to enable a manager to keep tabs on who accesses a facility and the units in real time, but also to archive activit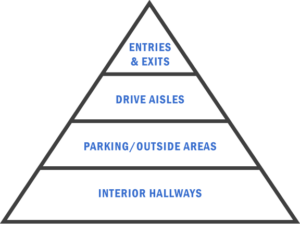 y in case of an incident or a dispute. Using our pyramid example from above, here are our recommendations for four tiers of camera coverage:
- Entrances and exits: The top tier of any video security system should be the areas where customers enter and exit the facility and buildings.
- Drive aisles: The next tier of camera placement should focus on the areas where site visitors move, like drive aisles.
- Lower traffic areas: The next tier of coverage should focus on monitoring less frequented areas of the facility, like boat and RV storage.
- Interior: The last tier of coverage should focus on interior hallways.
Keypad placement
The right number and proper placement of keypads around your facility can provide effective security, while keeping your budget at a manageable level. Using our pyramid example:
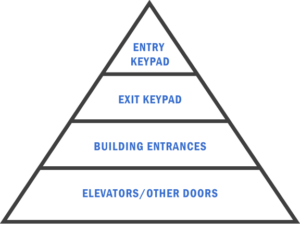
- Site entrance: At the very least, you should have a keypad at the front gate (assuming you have a gated site) to enable you to monitor traffic entering the facility.
- Site exit: The next level would be a keypad at the exit to enable you to monitor people arriving to and leaving your facility.
- Building entrances: The third level should be building entrances. If you have interior hallways to any of your buildings, you can locate keypads at these entry doors and restrict access to other buildings.
- Elevators: The fourth level should be elevators. You can require customers to enter an access code to use the elevator and travel to their floor.
- Lower traffic doors: Last priority should be doors like maintenance closets, delivery
- rooms, and others.
A few notes about gates and alarms
Gates: At Storage Construction, we strongly recommend having an entrance and exit gate to be able to restrict access to your facility. We also recommend keeping your gate count to a bare minimum, and laying out your site in such a way as to not need multiple gates to manage traffic flow.
Alarms: Door and burglar alarms can sometimes be useful, but are often something that can weigh down a budget. We typically suggest this as an item that can be trimmed from a project, especially if the facility isn’t located in an area with repeated incidents of crime.
These are just a few suggestions we incorporate into our comprehensive design-build process. If you’d like to learn more about self-storage security, or our process in general, we’re glad to answer any questions.